原视频: The spelled-out intro to neural networks and backpropagation: building micrograd
注意,可以透过将代码复制到 colab 或 jupyter notebook 运行, 部分生图的输出结果本文贴图效果不佳,所以建议亲自动手跟着视频操作理解。本文的笔记仅作参考。
import os
import math
import torch
import numpy as np
import matplotlib.pyplot as plt
%matplotlib inline
目的
目标是理解对于micrograd示例中的神经网络(Neural Network, NN)定义、训练和反向传播(backprop)是什么样子的。这个教程基本上是一个逐步的项目演示。
Micrograd是一个自动微分引擎(Autograd engine),它仅用150行代码就包含了训练神经网络的所有必要元素。
Micrograd还从头实现了反向传播(Backpropagation)。
反向传播允许你迭代调整神经网络的权重,以最小化给定的损失函数/提高预测准确性。
什么是 Micrograd?
Micrograd是一个小巧友好的自动微分引擎,支持自动微分和高阶导数计算。
它由不到150行的Python代码组成,是理解通用自动微分引擎工作原理的有效学习工具。
简单的使用示例:
from micrograd.engine import Value

a = Value(-4.0) # create a "Value" object
b = Value(2.0)
c = a + b # transform a and b into c with "+"
c += c + 1
c += 1 + c + (-a)

print(c.data) # prints -1.0

c.backward()

print(a.grad) # prints 3.0
print(b.grad) # prints 4.0
-1.0
3
4
实质上,Micrograd允许你定义值并对这些值应用操作。
它通过所谓的表达式图跟踪值的使用情况。最后,该图反向遍历来计算因应用操作而产生的梯度。
在上面的代码中,a和b通过多个不同的操作影响c。我们运行c. backward()来计算a和b的微分。这些微分表示最终结果c对受影响值a和b变化的敏感度。
例如,初始值b的小幅改变会导致最终结果c的改变是其4.0倍。这表明了值的变化如何影响最终结果。
上述示例还没有展示,但反向传播可以应用于各种操作。对于多层感知器(MLP),它是神经网络的一个子类,情况要具体一些。在那里,输入和权重通过矩阵乘法和加法相互作用。但是我们提前介绍了这个概念。
从
c开始,通过递归应用链式法则到影响值c的所有表达式图节点来计算梯度。
问题解析
理解导数
如果我们想要计算对其他变量有贡献的变量的部分影响,那么导数是必不可少的。 它们正好满足我们的需求:量化输入变化对输出的影响程度。
让我们用Python实现函数
$$f(x) = 3x^2 - 4x + 5$$:
def f(x):
    return 3*x**2 - 4*x + 5 # arbitrary function

f(3.0)
20.0
现在,我们来绘制这个函数的图:
xs = np.arange(-5, 5, 0.25) # set of values from -5 to 5 with step 0.25
ys = f(xs) # applying f to each x
plt.plot(xs, ys); # plot y for each x
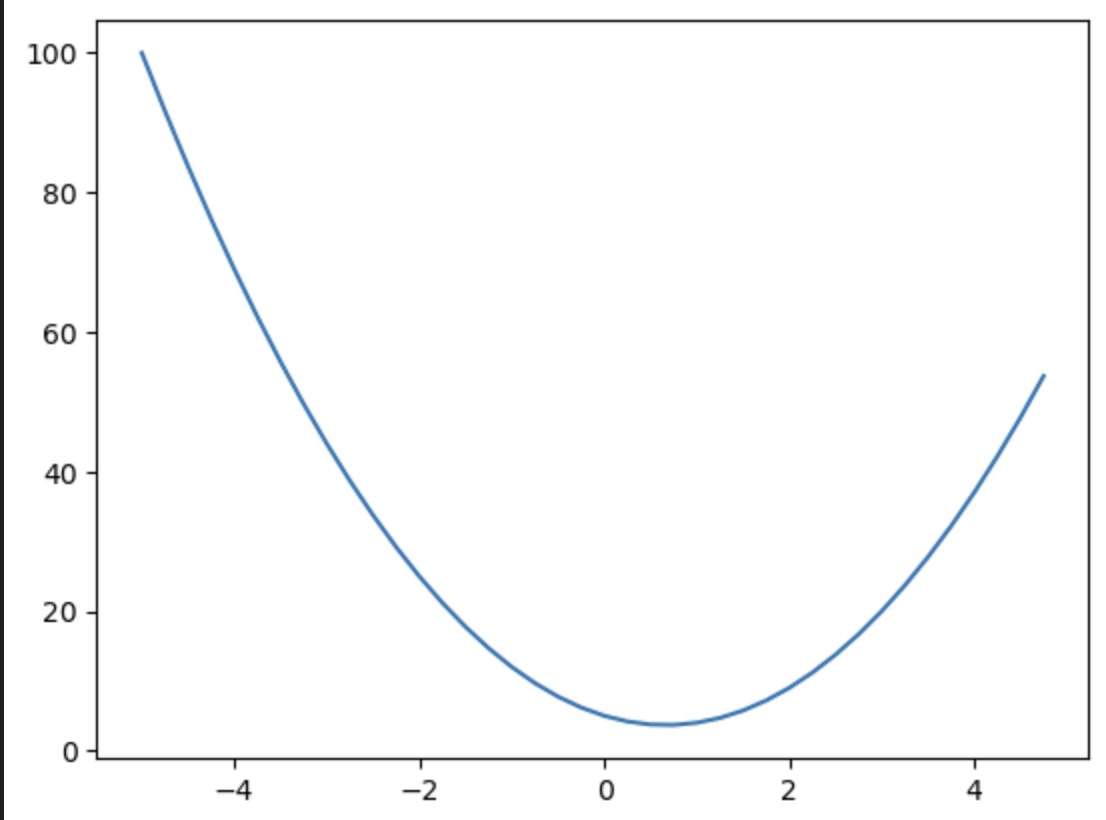
现在,对于这个函数 \(f(x)\) 在任意点 \(x\) 的导数是多少呢?要理解这一点,我们需要了解关于函数 \(f(x)\) 导数告诉我们什么。
官方上,可微分性的定义是这样的:
$$\lim_{{h \to 0}} \frac{{f(a+h)-f(a)}}{h}$$这里要求我们在接近 \(a\) 的正 \(h\) 处加到我们的函数中,看看这是否会使函数值比 \(f(a)\) 增加或减少。
如果函数增加,导数为正;如果函数减小,导数为负。让我们直接实现这个定义:
h = 0.00000001
x = 3.0

# Approximate derivative of f at x=3
print((f(x+h)-f(x))/h)
14.00000009255109
这告诉我们,关于 \(x\) 在 \(x=3\) 处的 \(f\) 的导数是 \(m \approx 14\) 。
微积分教导我们,函数 \(f(x) = 3x^2 - 4x + 5\) 的导数是 \(f'(x) = 6x - 4\),所以 \(f'(3) = 14\) ,但在这里我们完全基于定义进行操作。
让我们变得更复杂一点:3个输入,1个输出:
a = 2.0
b = -3.0
c = 10.0
d = a*b + c

print(d)
4.0
给定上述代码,d = a * b + c仍是一个函数。
对于d关于a、b和c的导数是什么?让我们再次采取非常直接的方法:
h = 0.00001

# This is the point (a, b, c)
# for which we want the derivative of d
a = 2.0
b = -3.0
c = 10.0

d1 = a*b + c # function value at (a, b, c)

a += h       # bump up a by h
d2 = a*b + c # function value at (a+h, b, c)
a -= h       # restore a

b += h       # bump up b by h
d3 = a*b + c # function value at (a, b+h, c)
b -= h       # restore b

c += h       # bump up c by h
d4 = a*b + c # function value at (a, b, c+h)

print('Function value for (a,b,c) d1:\t', d1)
print()
print('Function value for (a+h,b,c) d2:', d2)

# How much the function increased from bumping up a
print('slope', (d2 - d1)/h)
print('\nFunction value for (a,b+h,c) d3:', d3)
# How much the function increased from bumping up b
print('slope', (d3 - d1)/h)
print('\nFunction value of (a,b,c+h) d4:\t', d4)
# How much the function increased from bumping up c
print('slope', (d4 - d1)/h)
Function value for (a,b,c) d1:	 4.0

Function value for (a+h,b,c) d2: 3.9999699999999994
slope -3.000000000064062

Function value for (a,b+h,c) d3: 4.00002
slope 2.0000000000131024

Function value of (a,b,c+h) d4:	 4.00001
slope 0.9999999999621422
这些修改后的函数告诉我们原始函数值随着每个输入值的变化情况。
这是关于a、b或c的函数偏导数。
偏导数告诉我们,当函数的一个输入发生变化时,其输出如何变化。
神经网络中的微分
值类 - 设置
我们希望将微分的逻辑转移到神经网络中。 为了实现这一点,我们需要合适的数据结构。
Value类接受一个数字值并跟踪它。你可以像这样定义值:a = Value(3.0)和b = Value(-2.0),
但是然后你还应该能够执行a + b或a * b来构建操作图。
从这里,我们应该能够找到最终结果关于初始值的微分。
class Value:

    # Object initialization
    def __init__(self, data):
        self.data = data

    # Tells how to print this object nicely
    def __repr__(self):
        return f"Value(data={self.data})"

    # Addition, a+b == a.__add__(b)
    def __add__(self, other):
        out = Value(self.data + other.data)
        return out

    # Multiplication
    def __mul__(self, other):
        out = Value(self.data * other.data)
        return out

a = Value(2.0)
b = Value(-3.0)
c = Value(10.0)
d = a * b + c # this really is: a.__mul__(b).__add__(c)

print(d) # Value(data=4.0)
Value(data=4.0)
值类 - 前向传播
数据存储和表示,以及乘法和加法都已经考虑到了。现在我们缺少的是一个结构来知道应用了哪些操作、应用的顺序以及在途中Value对象之间建立的连接。
换句话说,我们想要记录特定Values如何产生其他Values。为了添加这种跟踪能力,我们在Value类中添加了一个属性_children。
_children是一个空元组(内部存储为一个set,这个从元组到集合的概念转变只是为了性能)。
_children属性是直接影响当前Value对象的Value对象集合。对于c = a + b,c的_children集合将包含a和b。
你可能会问为什么我们将属性命名为_children和_prev而不是_parents和_prev。这是设计选择,但请放心,这不是错误。
原因是我们稍后会反向遍历图,从结果到输入。所以,现在技术上看起来像是父节点的元素到时候看起来就像是子节点。
class Value:

    # This got extended to take in _children
    def __init__(self, data, _children=()):
        self.data = data
        self._prev = set(_children)

    def __repr__(self):
        return f"Value(data={self.data})"

    # Addition, a+b == a.__add__(b)
    def __add__(self, other):
        # We initialize the result's _children to be self and other
        out = Value(self.data + other.data, (self, other))
        return out

    # Multiplication
    def __mul__(self, other):
        # We initialize the result's _children to be self and other
        out = Value(self.data * other.data, (self, other))
        return out

a = Value(2.0)
b = Value(-3.0)
c = Value(10.0)
d = a * b + c

d # Value(data=4.0)
d._prev # {Value(data=-6.0), Value(data=10.0)}
{Value(data=-6.0), Value(data=10.0)}
现在我们知道直接的前驱值(即子节点),但我们不知道如何使用这些值创建了d。为了实现这一点,我们进一步扩展Value类。
另外添加了一个标签属性,用于下面生成图,这纯粹是为了可视化目的。
class Value:

    def __init__(self, data, _children=(), _op='', label=''):
        self.data = data
        self._prev = set(_children)
        self._op = _op
        self.label = label

    def __repr__(self):
        return f"Value(data={self.data})"

    # Addition
    def __add__(self, other):
        out = Value(self.data + other.data, (self, other), '+')
        return out

    # Multiplication
    def __mul__(self, other):
        out = Value(self.data * other.data, (self, other), '*')
        return out

a = Value(2.0, label='a')
b = Value(-3.0, label='b')
c = Value(10.0, label='c')
e = a*b; e.label='e'
d = e+c; d.label='d'

f = Value(-2.0, label='f')
L = d*f; L.label = 'L'

print(L)       # Value(data=-8.0)
print(L._prev) # {Value(data=-2.0), Value(data=4.0)}
print(L._op)   # *
Value(data=-8.0)
{Value(data=-2.0), Value(data=4.0)}
*
值类 - 图生成
现在我们可以跟踪到d是由两个值e和c相加产生的。更普遍地说,我们可以追踪哪个Value是基于哪些其他值创建的以及如何创建的,就像构成最终解节点的树一样。
理想情况下,我们希望能够可视化我们的表达式图。相应的代码可能看起来有点吓人:
from graphviz import Digraph

# Enumerates all the nodes and edges -> builds a set for them
def trace(root):
    # builds a set of all nodes and edges in a graph
    nodes, edges = set(), set()
    def build(v):
        if v not in nodes:
            nodes.add(v)
            for child in v._prev:
                edges.add((child, v))
                build(child)
    build(root)
    return nodes, edges

# Draw the graph
def draw_dot(root):
    dot = Digraph(format='svg', graph_attr={'rankdir': 'LR'}) # LR = left to right

    nodes, edges = trace(root)
    for n in nodes:
        uid = str(id(n))
        # for any value in the graph, create a rectangular ('record') node for it
        dot.node(name = uid, label = "{ %s | data %.4f }" % (n.label, n.data), shape='record')
        if n._op:
          # if this value is a result of some operation, create an op node for it
          dot.node(name = uid + n._op, label = n._op)
          # and connect this node to it
          dot.edge(uid + n._op, uid)

    for n1, n2 in edges:
        # connect n1 to the op node of n2
        dot.edge(str(id(n1)), str(id(n2)) + n2._op)

    return dot

draw_dot(L)

快速回顾
到目前为止,
- 我们可以使用 \(+\) 和 \(*\) 构建数学表达式,
- 我们可以追踪哪些
Value对象通过什么操作互连,从而产生一个新的Value - 我们可以可视化与给定结果
Value相关的表达式图
目前,我们仅可视化前向传播部分。 接下来,我们需要涵盖反向传播。
值类 - 设置反向传播
让我们继续上面如何创建L的例子。
我们从前向传播的结果(即L)开始。然后,逆序遍历依赖树来计算中间值的梯度。
本质上,对于每个节点,我们都计算
L关于这个节点的导数。L关于L的导数是 \(1\) 。简单明了,但L关于f的导数以及之后的值又是什么呢?
一个值(如L)相对于另一个参与形成的值(如f)的导数称为偏导数,也被称为梯度。
梯度是损失函数相对于当前
Value的导数。
默认情况下,每个Value的导数设置为0。在依赖树中它参与的每一个数学交互都会相应地修改这个值。
class Value:

    def __init__(self, data, _children=(), _op='', label=''):
        self.data = data
        self.grad = 0.0
        self._prev = set(_children)
        self._op = _op
        self.label = label

    def __repr__(self):
        return f"Value(data={self.data})"

    # Addition, a+b == a.__add__(b)
    def __add__(self, other):
        out = Value(self.data + other.data, (self, other), '+')
        return out

    # Multiplication
    def __mul__(self, other):
        out = Value(self.data * other.data, (self, other), '*')
        return out

    def tanh(self):
        x = self.data
        t = (math.exp(2*x) - 1)/(math.exp(2*x) + 1)
        return Value(t, (self, ), 'tanh')

a = Value(2.0, label='a')
b = Value(-3.0, label='b')
c = Value(10.0, label='c')
e = a*b; e.label='e'
d = e+c; d.label='d'

f = Value(-2.0, label='f')
L = d*f; L.label = 'L'

print(L)       # Value(data=-8.0)
print(L._prev) # {Value(data=-2.0), Value(data=4.0)}
print(L._op)   # *
Value(data=-8.0)
{Value(data=-2.0), Value(data=4.0)}
*
让我们来看看操作树中的情况:
def trace(root):
    # builds a set of all nodes and edges in a graph
    nodes, edges = set(), set()
    def build(v):
        if v not in nodes:
            nodes.add(v)
            for child in v._prev:
                edges.add((child, v))
                build(child)
    build(root)
    return nodes, edges

# Draw the graph
def draw_dot(root):
    dot = Digraph(format='svg', graph_attr={'rankdir': 'LR'}) # LR = left to right

    nodes, edges = trace(root)
    for n in nodes:
        uid = str(id(n))
        # for any value in the graph, create a rectangular ('record') node for it
        dot.node(name = uid, label = "{ %s | data %.4f | grad %.4f }" % (n.label, n.data, n.grad), shape='record')
        if n._op:
          # if this value is a result of some operation, create an op node for it
          dot.node(name = uid + n._op, label = n._op)
          # and connect this node to it
          dot.edge(uid + n._op, uid)

    for n1, n2 in edges:
        # connect n1 to the op node of n2
        dot.edge(str(id(n1)), str(id(n2)) + n2._op)

    return dot

draw_dot(L)

在这个依赖树结构中,每个节点都有一个字段来存储反向传播的值。 但是梯度的计算和累积仍然缺失。让我们先尝试一下:
# This is just always the case
L.grad = 1.0

# As L = d * f is given we're certain that dL/dd = f
d.grad = f.data

# and therefore this is also true
f.grad = d.data
到目前为止,一切顺利。现在我们来探讨反向传播的核心部分。
如果你理解了接下来的部分,你就掌握了神经网络训练的基本原理。
让我们引入一些数学符号。
假设我们需要确定L相对于c的偏导数,或者 \(\frac{\partial L}{\partial c}\) 。另外假设我们遵循上面的例子,即:
- \(e = a * b\)
- \(d = e + c\)
- \(L = d * f\)
对于我们的示例,我们假设已知:\(\frac{\partial L}{\partial d} = -2.0\)。
我声称仅从这个设置出发,我们可以直接得出c和e的局部导数分别为1。如何?为什么?什么?
好吧,“局部导数”指的是在使用c和e的最近的操作中:\(d = c + e\)。
直观上讲,对c或e的特定大小的改变会以完全相同的大小影响d。因此,对于c和e而言,“局部导数”,或者说是“影响因子”都是1。
由于我们的目标是找到 \(\frac{\partial L}{\partial c}\) ,我们需要以某种方式将已知的中间结果 \(\frac{\partial L}{\partial d}\) 与局部导数 \(\frac{\partial d}{\partial c}\) 结合起来,从而在两者之间形成 \(\frac{\partial L}{\partial c}\)。
这看起来像是链式法则的任务! 链式法则的表达形式如下:

有趣的是,\(\frac{\partial d}{\partial c}\) 对最终结果 \(\frac{\partial L}{\partial c}\) 没有影响,因为它为1.0。
$$\frac{\partial L}{\partial c} = \frac{\partial L}{\partial d} * \frac{\partial d}{\partial c} = \frac{\partial L}{\partial d} = \frac{\partial L}{\partial e} = \underline{\underline{-2.0}}$$因为加法节点的局部导数是
1.0,所以加法节点基本上会将梯度平等地传递给被相加的值。 换句话说,加法操作均匀地将我们积累到目前为止的梯度分配给求和项。
深入依赖树,e由a和b通过乘法操作e = a * b构成。现在我们不处理加法,而是处理乘法。
从上面我们可以得知 \(\frac{\partial L}{\partial e} = -2.0\) 。首先,同样地,我们先来计算局部导数:\(\frac{\partial e}{\partial a}\) 和 \(\frac{\partial e}{\partial b}\) 。根据e = a * b,我们可以看到:
两个因子影响结果的规模由另一个因子定义。
我们再次使用链式法则来计算\(\frac{\partial L}{\partial a}\) 和 \(\frac{\partial L}{\partial b}\) :
$$\frac{\partial L}{\partial a} = \frac{\partial L}{\partial e} * \frac{\partial e}{\partial a} = -2.0 * -3.0 = \underline{\underline{6.0}}$$ $$\frac{\partial L}{\partial b} = \frac{\partial L}{\partial e} * \frac{\partial e}{\partial b} = -2.0 * 2.0 = \underline{\underline{-4.0}}$$结合c和e的梯度,这是更新后的图形:
# Gradients of sum
c.grad = d.grad * (1) # dL/dc = dL/dd * dd/dc = dL/dd * 1
e.grad = d.grad * (1) # dL/de = dL/dd * dd/de = dL/dd * 1

# Gradients of multiplication
a.grad = e.grad * b.data # dL/da = dL/de * de/da = dL/de * b
b.grad = e.grad * a.data # dL/db = dL/de * de/db = dL/de * a

draw_dot(L)

让我们看看在根据它们的梯度更新贡献变量时,L如何变化:
# Moving leaf nodes in gradient direction
# This is gradient ascent (not descent)
a.data += 0.01 * a.grad
b.data += 0.01 * b.grad
c.data += 0.01 * c.grad
f.data += 0.01 * f.grad

# Forward pass
e = a * b
d = e + c
L = d * f

print(L.data) # L increased
-7.286496
为什么我们看到L的增加?
梯度始终指向斜率最陡峭的方向。 朝着该方向移动一个值会通过这个值对最终结果产生最大的可能增长效果。 将所有值朝梯度方向移动可以最大化最终结果。 将所有值移动到与此梯度相反或负方向,因此最大限度地减小了最终结果。
神经网络
让我们将前向传播和反向传播的概念应用到神经网络中。最终,我们想要构建能够工作的神经网络(NN):
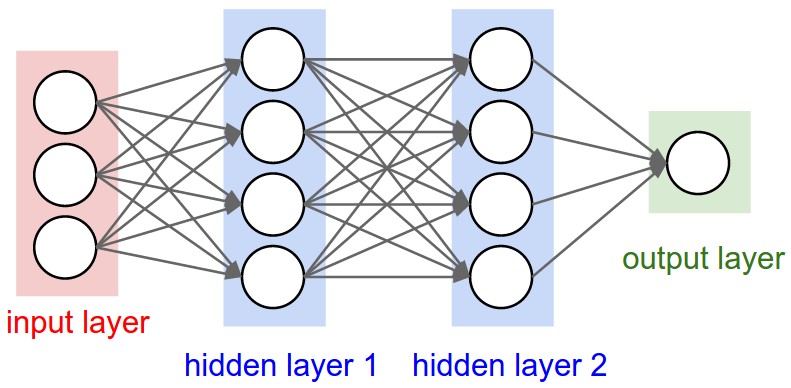
我们可以利用这种数学模型来描述神经网络中的一个神经元的外观:
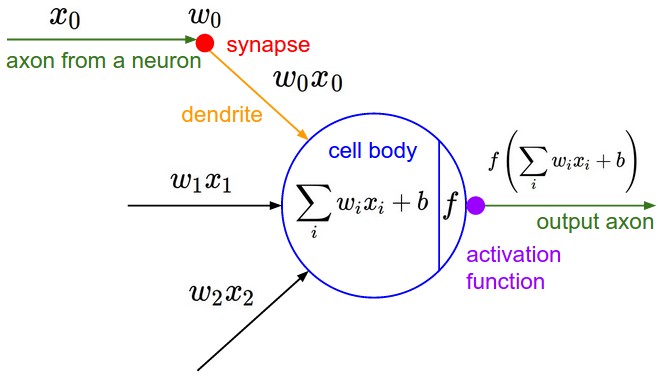
这里使用的激活函数(在CS231n中使用)是tanh。
仅供参考,以下是tanh和sigmoid(另一种激活函数)的图示:
def sigmoid(x):
    a = []
    for i in x:
        a.append(1/(1+math.exp(-i)))
    return a

fig, (ax1, ax2) = plt.subplots(1, 2)
fig.suptitle('Tanh vs. Sigmoid')

lower = -5
upper = 5
step = 0.2

ax1.grid()
ax1.set_title('Tanh')
ax1.plot(np.arange(lower, upper, step), np.tanh(np.arange(-5, 5, 0.2))) # Tanh activation function
ax2.grid()
ax2.set_title('Sigmoid')
ax2.plot(np.arange(lower, upper, step), sigmoid(np.arange(-5, 5, 0.2))) # Sigmoid activation function (alternative)

plt.show()
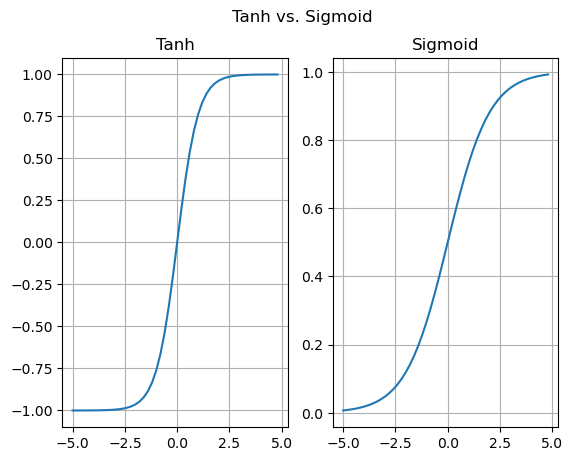
tanh函数的取值范围是[-1,1],而sigmoid函数的取值范围是[0,1]。
在我们特定的情况下,每个训练迭代中,tanh会产生更精确的梯度,从而实现更有效的训练循环。但不要将这种观念泛化。
现在,让我们继续构建一个非常小的多层感知器(MLP),只需实现对于n=2的公式\(tanh(\sum_{i=1}^{n} w_i * x_i + b)\):
import numpy as np

def tanh(x):
    return np.tanh(x)

# Input and weights for the single neuron
x = np.array([0.5, -0.3])  # For simplicity, we'll use a vector of inputs here.
weights = np.array([-0.1, 0.2])

# Bias (b) is set to 0 for this simple example
bias = 0

# Implement the neuron's output using the tanh activation function
neuron_output = tanh(np.dot(weights, x) + bias)

print("Neuron Output:", neuron_output)
tanh函数的取值范围是[-1,1],而sigmoid函数的取值范围是[0,1]。
在我们特定的情况下,每个训练迭代中,tanh会产生更精确的梯度,从而实现更有效的训练循环。但不要将这种观念泛化。
现在,让我们继续构建一个非常小的多层感知器(MLP),只需实现对于n=2的公式 \(tanh(\sum_{i=1}^{n} w_i * x_i + b)\):
import numpy as np

def tanh(x):
    return np.tanh(x)

# Input and weights for the single neuron
x = np.array([0.5, -0.3])  # For simplicity, we'll use a vector of inputs here.
weights = np.array([-0.1, 0.2])

# Bias (b) is set to 0 for this simple example
bias = 0

# Implement the neuron's output using the tanh activation function
neuron_output = tanh(np.dot(weights, x) + bias)

print("Neuron Output:", neuron_output)
tanh函数的取值范围是[-1,1],而sigmoid函数的范围是[0,1]。
在我们的特定情况下,每次迭代时,tanh会产生更精确的梯度,从而导致更有效的训练周期。不过,不要泛化这个概念。
让我们继续构建一个非常小的多层感知器(MLP),仅通过实现n=2下的 \(tanh(\sum_{i=1}^{n} w_i * x_i + b)\):
# Inputs x1, x2
x1 = Value(2.0, label='x1')
x2 = Value(0.0, label='x2')

# Weights w1, w2
w1 = Value(-3.0, label='w1')
w2 = Value(1.0, label='w2')

# Bias b
# Making sure backprop numbers come out nice later on
b = Value(6.8813735870195432, label='b')

# Neuron value n: x1w1+x2w2 + b
x1w1 = x1*w1; x1w1.label='x1*w1'
x2w2 = x2*w2; x2w2.label='x2*w2'
x1w1x2w2 = x1w1 + x2w2; x1w1x2w2.label='x1*w1 + x2*w2'
n = x1w1x2w2 + b; n.label='n'

# Squashed activation o: tanh(n)
o = n.tanh(); o.label='o'

draw_dot(o)

手动反向传播
我们之前已经介绍了反向传播的基本原则。
但现在,让我们为这个设置实际执行手动反向传播:从o开始并向前推进,我们想要找出所有梯度。
最终,我们可以理想地回答:“
o关于x1, w1, x2, w2的导数是多少?”
这些是我们可以直接更改的变量,因此我们最关心它们。激活结果o的梯度始终为\(1.0\)。但是n(即 \(\frac{\partial o}{\partial n}\))的梯度又是什么呢?
tanh函数的局部导数是 \(1 - \text{tanh}^2(n)\) 。
有了这个定义,我们可以从后向前计算梯度:
# Always a given
o.grad = 1.0

# o = tanh(n), what is do/dn?
# do/dn = 1 - tanh(n)**2
n.grad = 1 - o.data**2

# As addition "just" splits the gradient
x1w1x2w2.grad = n.grad
b.grad = n.grad

# And addition again
x1w1.grad = x1w1x2w2.grad
x2w2.grad = x1w1x2w2.grad

# And multiplication handles like in the example above
x1.grad = x1w1.grad * w1.data
w1.grad = x1w1.grad * x1.data
x2.grad = x2w2.grad * w2.data
w2.grad = x2w2.grad * x2.data # this will be 0: changing this value does nothing, as its multiplied by 0
自动化反向传播
手动执行反向传播就像初级水平一样。
我们应该自动化并将其一般化。要做到这一点,我们需要重写或扩展Value类。
更具体地说,我们需要为Value对象添加一个 _backward 属性,并使用 None 初始化的 lambda 表达式。
对于每次操作,_backward 被填充了一个具体的梯度计算步骤。
下面的代码非常漂亮地实现了上述概念:
class Value:

    def __init__(self, data, _children=(), _op='', label=''):
        self.data = data
        self.grad = 0.0
        self._backward = lambda: None # Does nothing by default
        self._prev = set(_children)
        self._op = _op
        self.label = label

    def __repr__(self):
        return f"Value(data={self.data})"

    # Addition, a+b == a.__add__(b)
    def __add__(self, other):
        out = Value(self.data + other.data, (self, other), '+')

        def _backward():
            # Route gradient to parents
            self.grad = 1.0 * out.grad
            other.grad = 1.0 * out.grad

        out._backward = _backward
        return out

    # Multiplication
    def __mul__(self, other):
        out = Value(self.data * other.data, (self, other), '*')

        def _backward():
            # Route gradient affected by data of other node
            self.grad = out.grad * other.data
            other.grad = out.grad * self.data

        out._backward = _backward
        return out

    # Tanh activation function
    def tanh(self):
        x = self.data
        t = (math.exp(2*x) - 1)/(math.exp(2*x) + 1)
        out = Value(t, (self, ), 'tanh')

        def _backward():
            # Local derivative times gradient of child node
            self.grad = (1 - t**2) * out.grad

        out._backward = _backward
        return out

a = Value(2.0, label='a')
b = Value(-3.0, label='b')
c = Value(10.0, label='c')
e = a*b; e.label='e'
d = e+c; d.label='d'

f = Value(-2.0, label='f')
L = d*f; L.label = 'L'

print(L)       # Value(data=-8.0)
print(L._prev) # {Value(data=-2.0), Value(data=4.0)}
print(L._op)   # *
Value(data=-8.0)
{Value(data=4.0), Value(data=-2.0)}
*
现在,让我们构建一个简单的多层感知器(MLP),并对其进行前向传播:
# Inputs
x1 = Value(2.0, label='x1')
x2 = Value(0.0, label='x2')

# Weights
w1 = Value(-3.0, label='w1')
w2 = Value(1.0, label='w2')

# Bias
b = Value(6.8813735870195432, label='b') # Making sure backprop numbers come out nice later on

# Neuron value n: x1w1+x2w2 + b
x1w1 = x1*w1; x1w1.label='x1*w1'
x2w2 = x2*w2; x2w2.label='x2*w2'
x1w1x2w2 = x1w1 + x2w2; x1w1x2w2.label='x1*w1 + x2*w2'
n = x1w1x2w2 + b; n.label='n'

# Squashed activation: tanh(n)
o = n.tanh(); o.label='o'

draw_dot(o)

o.grad,请忽略这个并记住操作的确切顺序):
o.grad = 1.0  # Base case for backprop multiplication to work
o._backward()
n._backward()
b._backward() # Nothing happens, as this is a leaf
x1w1x2w2._backward()
x2w2._backward()
x1w1._backward()
draw_dot(o)

_backward() 方法。
反向遍历我们的表达式图意味着每个节点后面的任何内容都必须已计算完成。 这需要排序。我们可以使用 拓扑排序 来对依赖关系图进行排序。这将我们的节点排列成一种方式,使得边始终指向同一方向:
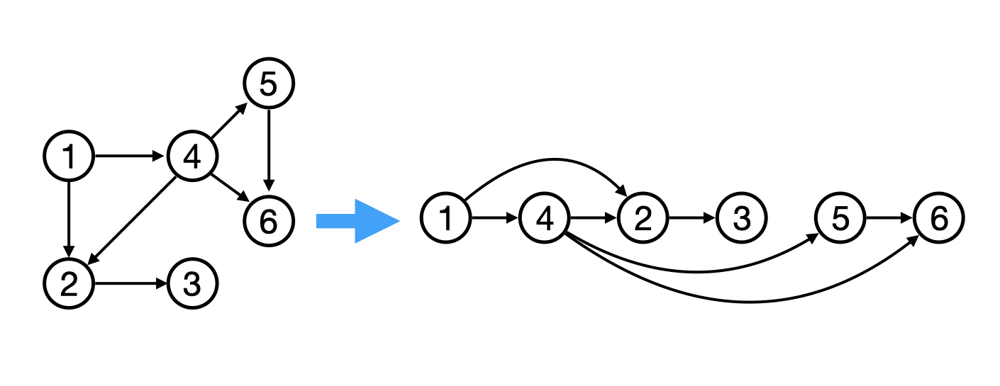
拓扑排序确保梯度计算和传播的方式避免了冗余计算,最大程度地提高了计算并行性,从而通过网络中梯度的无缝流动加速收敛速度。阅读更多…
# Topological sort
# Building the graph topologically

topo = []
visited = set()

def build_topo(v):
    if v not in visited:
        visited.add(v)
        for child in v._prev:
            build_topo(child)
        topo.append(v) # Only add node if all preceeding nodes were processed first
build_topo(o)

for t in topo:
    print(t)
Value(data=2.0)
Value(data=-3.0)
Value(data=-6.0)
Value(data=0.0)
Value(data=1.0)
Value(data=0.0)
Value(data=-6.0)
Value(data=6.881373587019543)
Value(data=0.8813735870195432)
Value(data=0.7071067811865476)
现在,这就是从o开始对我们的图应用 _backward() 的确切顺序。
o.grad = 1.0

topo = []
visited = set()

def build_topo(v):
    if v not in visited:
        visited.add(v)
        for child in v._prev:
            build_topo(child)
        topo.append(v) # Only add node if all nodes were processed first
build_topo(o)

for node in reversed(topo):
    node._backward()

draw_dot(o)

我们现在将这个逻辑植入到Value类中。
这是新类结构:
class Value:

    def __init__(self, data, _children=(), _op='', label=''):
        self.data = data
        self.grad = 0.0
        self._backward = lambda: None # Does nothing by default
        self._prev = set(_children)
        self._op = _op
        self.label = label

    def __repr__(self):
        return f"Value(data={self.data})"

    # Addition
    def __add__(self, other):
        out = Value(self.data + other.data, (self, other), '+')

        def _backward():
            self.grad = 1.0 * out.grad
            other.grad = 1.0 * out.grad

        out._backward = _backward
        return out

    # Multiplication
    def __mul__(self, other):
        out = Value(self.data * other.data, (self, other), '*')

        def _backward():
            self.grad = out.grad * other.data
            other.grad = out.grad * self.data

        out._backward = _backward
        return out


    # Tanh activation function
    def tanh(self):
        x = self.data
        t = (math.exp(2*x) - 1)/(math.exp(2*x) + 1)
        out = Value(t, (self, ), 'tanh')

        def _backward():
            self.grad = (1 - t**2) * out.grad

        out._backward = _backward
        return out

    def backward(self):
        topo = []
        visited = set()

        def build_topo(v):
            if v not in visited:
                visited.add(v)
                for child in v._prev:
                    build_topo(child)
                topo.append(v) # Only add node if all nodes were processed first
        build_topo(self)

        self.grad = 1.0

        for node in reversed(topo):
            node._backward()
# Inputs x1, x2
x1 = Value(2.0, label='x1')
x2 = Value(0.0, label='x2')

# Weights w1, w2
w1 = Value(-3.0, label='w1')
w2 = Value(1.0, label='w2')

# Bias b
b = Value(6.8813735870195432, label='b') # Making sure backprop numbers come out nice later on

# Neuron value n: x1w1+x2w2 + b
x1w1 = x1*w1; x1w1.label='x1*w1'
x2w2 = x2*w2; x2w2.label='x2*w2'
x1w1x2w2 = x1w1 + x2w2; x1w1x2w2.label='x1*w1 + x2*w2'
n = x1w1x2w2 + b; n.label='n'

# Squashed activation o: tanh(n)
o = n.tanh(); o.label='o'

draw_dot(o)

o.backward()
draw_dot(o)

o而言是这样。
但是我们有一个bug。 看这里:
a = Value(3.0, label='a')
b = a + a; b.label = 'b'
b.backward()
draw_dot(b)

a+a等同于2*a。
这个错误行为在下一个例子中仍然存在:
a = Value(-2.0, label='a')
b = Value(3.0, label='b')
d = a * b; d.label='d'
e = a + b; e.label='e'
f = d * e; f.label='f'

f.backward()
draw_dot(f)

但在现实世界中的大多数例子中都是这种情况。
实际上我们需要 累加 梯度(
+=)而不是 设置/覆盖 它们(=)。
同时,在我们继续之前,让我们进一步扩展 Value 类。例如,我们不能执行 a = Value(2.0) + 1.0 或 a = Value(2.0) * 2.0。此外,我们现在还可以访问除法以及tanh背后的详细操作。
修复并扩展后的 Value 类看起来像这样(在后向函数中查看用于修复 += bug 的代码):
class Value:

    def __init__(self, data, _children=(), _op='', label=''):
        self.data = data
        self.grad = 0.0
        self._backward = lambda: None # Does nothing by default
        self._prev = set(_children)
        self._op = _op
        self.label = label

    def __repr__(self):
        return f"Value(data={self.data})"

    # Addition
    def __add__(self, other):
        other = other if isinstance(other, Value) else Value(other) # Extension
        out = Value(self.data + other.data, (self, other), '+')

        def _backward():
            self.grad += 1.0 * out.grad  # Bugfix
            other.grad += 1.0 * out.grad # Bugfix

        out._backward = _backward
        return out

    # Negation (special multiplication)
    def __neg__(self): # -self
        return -1 * self

    # Subtraction (special addition)
    def __sub__(self, other): # self - other
        return self + (-other)

    # Multiplication
    def __mul__(self, other):
        other = other if isinstance(other, Value) else Value(other) # Extension
        out = Value(self.data * other.data, (self, other), '*')

        def _backward():
            self.grad += out.grad * other.data # Bugfix
            other.grad += out.grad * self.data # Bugfix

        out._backward = _backward
        return out

    # Power (special multiplication)
    def __pow__(self, other):
        assert isinstance(other, (int, float)), "only supporting in/float powers (for now)"
        out = Value(self.data ** other, (self,), f'**{other}')

        def _backward():
            self.grad += other * (self.data ** (other - 1)) * out.grad

        out._backward = _backward
        return out

    # Called if self is on right side of *
    def __rmul__(self, other): # other * self
        return self * other

    # Called if self is on right side of +
    def __radd__(self, other): # other + self
        return self + other

    # True division (special multiplication)
    def __truediv__(self, other): # self / other
        return self * other**-1

    # Tanh activation function
    def tanh(self):
        x = self.data
        t = (math.exp(2*x) - 1)/(math.exp(2*x) + 1)
        out = Value(t, (self, ), 'tanh')

        def _backward():
            self.grad += (1 - t**2) * out.grad # Bugfix

        out._backward = _backward
        return out

    # Exponential function
    def exp(self):
        x = self.data
        out = Value(math.exp(x), (self, ), 'exp')

        def _backward():
            self.grad += out.data * out.grad

        out._backward = _backward
        return out


    def backward(self):
        topo = []
        visited = set()

        def build_topo(v):
            if v not in visited:
                visited.add(v)
                for child in v._prev:
                    build_topo(child)
                topo.append(v) # Only add node if all nodes were processed first
        build_topo(self)

        self.grad = 1.0 # Seed gradient always 1.0

        for node in reversed(topo):
            node._backward()
a = Value(-2.0, label='a')
b = Value(3.0, label='b')
d = a * b; d.label='d'
e = a + b; e.label='e'
f = d * e; f.label='f'

f.backward()
draw_dot(f)

# Just a sanity check for the newly implemented arithmetics

a = Value(2.0)
b = Value(4.0)

print(a + 2)
print(2 + a)
print(a * 2)
print(2 * a)
print(-a)
print(a - b)

print(a.exp())
print(a / b) # Division: a/b = a * (1/b) = a * (b**(-1)), so we use a function realizing x**k
Value(data=4.0)
Value(data=4.0)
Value(data=4.0)
Value(data=4.0)
Value(data=-2.0)
Value(data=-2.0)
Value(data=7.38905609893065)
Value(data=0.5)
所有内容汇总
现在我们将更改上面的示例。更具体地说,我们将使用现在可用的、针对tanh具有更多详细前向传播和反向传播操作的方法来定义o。
# Inputs x1, x2
x1 = Value(2.0, label='x1')
x2 = Value(0.0, label='x2')

# Weights w1, w2
w1 = Value(-3.0, label='w1')
w2 = Value(1.0, label='w2')

# Bias b
b = Value(6.8813735870195432, label='b') # Making sure backprop numbers come out nice later on

# Neuron value n: x1w1+x2w2 + b
x1w1 = x1*w1; x1w1.label='x1*w1'
x2w2 = x2*w2; x2w2.label='x2*w2'
x1w1x2w2 = x1w1 + x2w2; x1w1x2w2.label='x1*w1 + x2*w2'
n = x1w1x2w2 + b; n.label='n'

# Squashed activation o: tanh(n) NOW EXPLICITLY IMPLEMENTED
e = (2*n).exp()
o = (e - 1)/(e + 1); o.label='o'

draw_dot(o)

# The x1, x2 ... gradients should remain the same
o.backward()
draw_dot(o)

本质上,我们在此次运行中改变了实现级别。
我们可以选择仅仅实现一个tanh函数,也可以继续并显式地实现该函数的基本步骤。这在本质上是关于如何处理操作、在实现方法上进行放缩以及为必要步骤所需的新的梯度计算进行训练的练习。
使用PyTorch API执行完全相同的操作
原始的 micrograd 大致模仿了PyTorch语法。实际上,它也可以完全在PyTorch中实现。
不过这可能看起来有点混乱,因为它需要将值存储在PyTorch的Tensor对象中。
x1 = torch.Tensor([2.0]).double();  x1.requires_grad = True  # single element tensors
x2 = torch.Tensor([0.0]).double();  x2.requires_grad = True  # tensor datatype is now double
w1 = torch.Tensor([-3.0]).double(); w1.requires_grad = True  # default dtype was float32
w2 = torch.Tensor([1.0]).double();  w2.requires_grad = True  # now its float64 aka double
b = torch.Tensor([6.8813735870195432]).double(); b.requires_grad = True

n = x1*w1 + x2*w2 + b # perform arithmetic just like with micrograd
o = torch.tanh(n)

print(o.data.item())
o.backward() # backward() is pytorch's autograd function

print('---') # These values below are just like micrograds left most layer
print('x2', x2.grad.item())
print('w2', w2.grad.item())
print('x1', x1.grad.item())
print('w1', w1.grad.item())
0.7071066904050358
---
x2 0.5000001283844369
w2 0.0
x1 -1.5000003851533106
w1 1.0000002567688737
o.item() # Pluck out the scalar value from tensor o
0.7071066904050358
使用PyTorch的重要之处在于它在幕后实现了显著的效率提升 。
回到神经网络
既然我们已经有了一些构建复杂数学表达式的工具,就可以构建分层的神经网络(Neural Networks, NN)了。 我们将一步一步地完成,并最终得到一个两层的多层感知器(Multi-Layer Perceptron, MLP)。理论上,可以说micrograd前向传播的结果可以解释为神经元的激活。 因此我们可以构建一个接收并处理输入的神经元。不过现在我们将会利用PyTorch的功能来实现这一点。
为了完整性,以下是再次提供的神经网络概览图:

# One neuron is able to take multiple inputs and produce one activation scalar
class Neuron:
    def __init__(self, nin):
        # nin -> number of inputs to this neuron
        # Random weight [-1, 1] per input
        self.w = [Value(np.random.uniform(-1,1)) for _ in range(nin)]
        # Bias controls general "trigger happiness" of neuron
        self.b = Value(np.random.uniform(-1,1))

    def __call__(self, x): # running neuron(x) -> __call__ triggered
        # w * x + b
        # zip() creates iterator running over the tupels of two iterators
        # self.b is taken as the sum's start value and then added upon
        act = sum((wi*xi for wi, xi in zip(self.w, x)), self.b)
        # Squash the activation with tanh
        out = act.tanh()
        return out

    # Convenience code to gather the neuron's parameter list
    def parameters(self):
        return self.w + [self.b]


# A set of neurons making up a (hidden/input/output) NN layer
# E.g. n = Layer(2, 3) -> 3 2-dimensional neurons
class Layer:
    # nout -> how many neurons/outputs should be in this layer
    # nin -> how many inputs are to be expected per neuron
    def __init__(self, nin, nout):
        # literally create a list of neurons as needed
        self.neurons = [Neuron(nin) for _ in range(nout)]

    def __call__(self, x): # running layer(x) -> __call__ triggered
        # return all of the layer's neuron activations
        outs = [n(x) for n in self.neurons]
        return outs[0] if len(outs) == 1 else outs

    # Convenience code to gather all parameters of layer's neurons
    def parameters(self):
        return [p for neuron in self.neurons for p in neuron.parameters()]


# MLP -> Multi-layer perceptron -> NN
class MLP:
    # nin -> number of inputs to the NN
    # nouts -> list of numbers, defines sizes of all wanted layers
    def __init__(self, nin, nouts):
        sz = [nin] + nouts
        self.layers = [Layer(sz[i], sz[i+1]) for i in range(len(nouts))]

    def __call__(self, x): # mlp(x) -> call all layer(x)s values in NN
        for layer in self.layers:
            # Neat forward pass implementation
            x = layer(x)
        return x

    # Convenience code to gather all parameters of all layer's neurons
    def parameters(self):
        return [p for layer in self.layers for p in layer.parameters()]
x = [2.0, 3.0, -1.0]  # input values
n = MLP(3, [4, 4, 1]) # 3 inputs into 2 layers of 4 and one output layer
print(n(x))
Value(data=0.671796073870944)
draw_dot(n(x))

# Features/Inputs
xs = [
  [2.0, 3.0, -1.0],
  [3.0, -1.0, 0.5],
  [0.5, 1.0, 1.0],
  [1.0, 1.0, -1.0],
]

# Desired targets
ys = [1.0, -1.0, -1.0, 1.0]

# Get the NN's current prediction for xs
ypred = [n(x) for x in xs]

for i in range(len(ypred)):
    print(f'{ypred[i]}  \t--> {ys[i]}')
Value(data=0.671796073870944)  	--> 1.0
Value(data=0.7745946073328025)  	--> -1.0
Value(data=0.44576819586148025)  	--> -1.0
Value(data=0.7507951163502421)  	--> 1.0
目前,这个神经网络表现得并不好,因为它未经训练。我们需要衡量神经网络的性能如何,以便朝着提高其性能的方向迈出步伐。 我们需要一个损失函数 来评估预测的效果好坏。
loss = sum((yout - ygt)**2 for ygt, yout in zip(ys, ypred))
print('loss:', loss.data)
loss: 5.40925258770064
现在我们必须尽可能地降低这个损失。如果损失较低,那么预测结果将更接近通过标签提供的期望值。
loss.backward()
# Example neuron weight with now calculated gradient
print(n.layers[0].neurons[0].w[0].grad) # First layer's first neuron's first weight's gradient
print(n.layers[0].neurons[0].w[0].data) # First layer's first neuron's first weight's value
0.8369682644433301
-0.04508760561003777
# Weight Update with Backpropagation's gradients
for p in n.parameters():
    p.data += -0.01 * p.grad # Move a tiny bit in opposite direction of gradient to not overfit this single example
# Show updated weight
print(n.layers[0].neurons[0].w[0].data)
-0.053457288254471075
好的。我们有了一个损失函数来衡量神经网络的性能。
loss项直接与模型参数(MLP中激活的权重和偏置)相关联。在反向传播期间,如果我们计算梯度,我们将确定我们需要对权重和偏置进行多大程度和方向的改变,以最大化损失。
是的,最大化 。 但这正是我们不希望在这里看到的情况。 我们想 最小化 损失,这样可以抵消梯度并乘以一个因子 \(0.01\)。通过将所有参数朝梯度相反的方向轻轻移动一小步——而且只是很小的一步——我们可以避免过度适应单个输入期望权重应该是什么。这个过程称为 梯度下降 ,它用于训练神经网络。
恭喜你,你刚刚学会了如何从头开始构建和训练一个神经网络!
还有一件事。
训练通常不是仅将网络一次暴露于数据点,而是多次这样做。在训练期间遍历数据集的一个这样的周期称为 周期(epoch) 。我们现在将训练网络进行5个周期:
# Run epochs and show respective predictions
for t in range(5):
    ypred = [n(x) for x in xs]
    loss = sum((yout - ygt)**2 for ygt, yout in zip(ys, ypred))
    print(f'{loss.data}\t - {[y.data for y in ypred]}')

    loss.backward()
    for p in n.parameters():
        p.data += -0.01 * p.grad
5.08713918322257	 - [0.6321086214667953, 0.7270117403210391, 0.37659400898539336, 0.727576616197643]
4.335741644466197	 - [0.5405393454190497, 0.5886241580952339, 0.22254935370786932, 0.6739878630742078]
3.0356522171091176	 - [0.3753864100135888, 0.23725696356409384, -0.033667166079987314, 0.5746693750578489]
1.9684798493560975	 - [0.14158892840765466, -0.3028246646225663, -0.35719987348840376, 0.4234890888961274]
1.8666091864716037	 - [-0.046047609041428114, -0.6479928117933893, -0.6247123606342206, 0.28750879775224464]